Running Pgweb behind OAuth2 proxy
Exposing Pgweb interface to public internet poses a huge risk, especially if not properly secured. A common use case is to provide an easy UI for developers/data teams to explore live data or run ad-hoc queries without having to provide a direct access to production databases. Things like firewall and VPN might get in a way. Distributing the database credentials is also a bad idea in general. Let's explore our options to sort out the access model.
Pgweb by itself does not provide any means of authenticating users based on identity providers such as Google or Github, and only supports HTTP basic authentication out of the box, via --auth-user and --auth-pass CLI options. This may work for one-off setups, but not very scalable on organization level (we still need to share password, etc).
Auth proxy
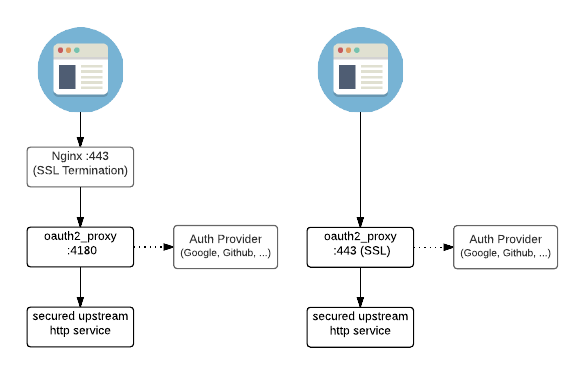
A tool like oauth2-proxy comes very handy for a use case like that! We could easily integrate with over 10 identity providers in a generic way. Most folks would use Google, so that's what we're going to use as an example moving forward. Docs provide an architecture overview:
Testing locally
Follow these steps to configure Google OAuth for locally running Pgweb.
- Make sure to download the latest
oauth2-proxyrelease. Head over to Github: https://github.com/oauth2-proxy/oauth2-proxy/releases - Next, we need to create and configure a new Google project, head over to Developer Console. Once you create a new project, you must configure
Oauth Concent screen, this is where you can pickInternalorExternaluser type. PickInternalif your Google organization permits (that'll allow logging in only with corp email), otherwiseExternalwill be okay for testing. Follow prompts for application setup. - Switch to
Credentialssection and click onCreate Credentials. From the dropdown, pickOAuth Client ID. Next, enterWeb Applicationin theApplication Typedropdown. - On the same page, enter
http://localhost:4180/oauth2/callbackintoAuthorized redirect URIsinput field. HitCreate. - On the next screen you will be prompted the OAuth client ID and secret ID, save these values as we will need them to configure our OAuth in the next step.
To start the proxy, replace --client-id, --client-secret and --cookie-secret values:
./oauth2-proxy \
  --skip-provider-button=true \
  --provider=google \
  --client-id=<REPLACE ME: OAUTH_CLIENT_ID> \
  --client-secret=<REPLACE ME: OAUTH CLIENT SECRET> \
  --cookie-secret=<GENERATE RANDOM STRING> \
  --cookie-expire=4h0m0s \
  --email-domain='*' \
  --http-address=0.0.0.0:4180 \
  --upstream=http://localhost:8081 \
  --redirect-url=http://localhost:4180/oauth2/callback
Keep in mind, the --email-domain='*' setting will allow ANY Google email, which is okay for testing, but should be swapped out for real deployments.
Next, in the new terminal window, start pgweb process:
pgweb --db=my-awesome-database --bind=0.0.0.0
If everything configured correctly, you should be able to hit the endpoints:
http://localhost:8081- Pgweb UI, should work if your database exists, make sure you have it running first before trying to authenticate with Googlehttp://localhost:4180- On the first visit you will be redirected to Google OAuth consent page, you can choose any Google account from there.
You're all set. For any additional information on provider setup, visit official documentation.
Troubleshooting
A few things may go wrong with the setup, common issues are:
- Not adding the correct redirect URL in the
Authorized redirect URIsin Google Developer Console. Make sure to add new URLs when deploying OAuth proxy on multiple domains/endpoints. - Not setting up the correct
--upstreamwith Pgweb. Pgweb DOES NOT listen on0.0.0.0address (any network interface) by default, you should enable that option with--bind=0.0.0.0.This is only necessary if youroauth2-proxyprocess is not running on the same machine aspgweb.